DTF Printing Workflow is reshaping how printers in California approach textile projects, redefining how teams manage the DTF printing workflow California landscape and turn design concepts into physical garments with precision. In practice, this end-to-end process covers Direct-to-film printing setup, DTF film transfer steps, color preparation, and reliable transfer workflows that keep production moving. A well-tuned workflow depends on solid DTF color management to reproduce brand hues and maintain consistency across batches. Shops that master troubleshooting and best practices minimize misprints, powder issues, and delays, especially in a fast-moving California market. From design to dispatch, this approach emphasizes planning, calibration, and quality checks that deliver reliable results while staying competitive.
Another way to frame this conversation is the direct-to-film production pipeline, where artwork travels from design to fabric through a transfer film. This perspective spotlights the critical steps such as substrate selection, color profiling, printer calibration, and precise heat pressing to deliver repeatable results. From an information-architecture standpoint, terms like film-based transfer, adhesive powder workflows, curing, and post-press finishing are LSI-friendly concepts that map to the same core process. By weaving synonyms such as fabric-ready print, transfer film steps, and on-demand apparel printing, readers can connect to related topics while keeping the focus on quality and efficiency.
DTF Printing Workflow: California Essentials for 2026
In California’s competitive apparel market, mastering the DTF Printing Workflow from design to dispatch delivers reliability, speed, and consistency. Position your shop to meet high-volume demands while maintaining color fidelity and durable transfers. The DTF Printing Workflow anchors every decision—from file prep to packaging—so you can predict outcomes and reduce reprints in a fast-moving California environment.
Adapting the DTF printing workflow California reality means planning for humidity, equipment reliability, and quick turnarounds. By aligning design, color management, printer calibration, powdering, curing, and transfer steps under a single workflow, California shops can streamline production and boost profitability. This approach also supports scalable growth as you add new substrates, runs, and clients, leveraging proven best practices across the full DTF printing pipeline.
Direct-to-Film Printing Setup: Gear, Film, and Powder Best Practices
Getting consistent results starts with a reliable Direct-to-film printing setup. Choose a printer, heat press, and cure station designed for high-volume runs and easy maintenance. Regular calibration, nozzle checks, and firmware updates help minimize color drift and misprints in busy California shops.
Select film and powder combinations that match your printer and substrates, and build color profiles for common garment colors. Create test swatches on actual fabrics and keep a small library of settings for quick batch changes, ensuring production remains efficient in California’s dynamic market.
DTF Color Management: Achieving Brand-accurate Hues on California Garments
DTF color management requires calibrated monitors, ICC profiles for each fabric type, and soft proofing to anticipate how transfers appear post-run. In California, where brand colors must be consistent across channels, precise color management reduces reprints and client dissatisfaction.
Leverage proofing workflows and on-garment tests; if colors shift after transfer, adjust the white underprint, film density, or substrate selection to bring the result back in line with client expectations.
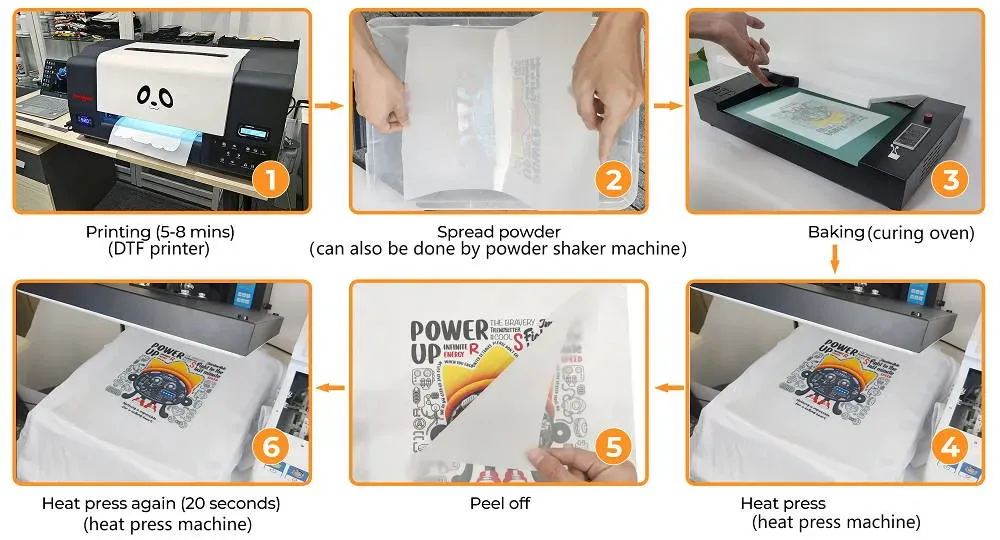
DTF Film Transfer Steps: From Print to Wearable Artwork
DTF film transfer steps begin with printing the design on the film, followed by applying an adhesive powder, curing the powder, and finally transferring the design to fabric with a calibrated heat press.
During the transfer, use the correct temperature, pressure, and dwell time to ensure ink density and adhesion. Typical ranges are around 145–165°C (293–329°F) for 10–20 seconds, depending on substrate and film type, and always start with a controlled test on a sample garment.
DTF Troubleshooting and Best Practices: Quick Fixes for California Production
DTF troubleshooting and best practices focus on rapid diagnosis and repeatable corrective actions. Common issues include color drift, white underprint misalignment, powder flaking, sticking to non-target fabrics, and misalignment.
Address these problems with a structured approach: recheck printer calibration, refresh color profiles, verify underprint alignment, adjust powder amount and curing duration, and maintain clean equipment. Document fixes, monitor batch yield, and train staff to prevent recurring faults.
Frequently Asked Questions
How does the DTF printing workflow California optimize color accuracy and consistency in practice?
To optimize color accuracy in the DTF printing workflow California, follow a consistent color-management pipeline: use garment-specific ICC profiles, calibrate monitors, and soft-proof designs before printing. Run physical test swatches on target fabrics to anticipate color shifts after film transfer. Standardize underprint layers and color separations, and document color decisions for repeatability across batches.
What is the recommended Direct-to-film printing setup for reliable production?
A reliable Direct-to-film printing setup starts with compatible printer, film, and adhesive powder. Ensure the heat press, drying/cure station, and printer are clean and calibrated. Establish color profiles for each garment substrate, print test swatches, and maintain routine equipment maintenance to prevent misalignment and color drift.
How does DTF color management impact batch-to-batch consistency across California shops?
DTF color management drives batch consistency by using ICC profiles for each fabric, calibrated monitors, and soft proofing aligned with the production environment. Create physical proofs when possible and maintain a centralized color library and clear documentation so teams across California shops reproduce colors consistently from design to dispatch.
What are the essential DTF film transfer steps to ensure durable, high-quality transfers?
Key DTF film transfer steps: print the design on film with proper density, apply a light, even layer of adhesive powder, cure the powder, and transfer to garment at the correct settings (typical 145–165°C/293–329°F for 10–20 seconds). Allow to cool gradually and inspect for full adhesion, edge crispness, and fabric texture compatibility.
What are common DTF troubleshooting and best practices to reduce misprints and returns?
Common DTF troubleshooting and best practices include: verify accurate alignment, ensure the white underprint is properly positioned, check powder adhesion and curing, and confirm heat press settings suit the fabric. Maintain equipment, implement standard operating procedures, run QC checkpoints, and document fixes to minimize misprints and returns.
| Topic | Key Points |
|---|---|
| Design and Prepress |
|
| Direct-to-film printing setup |
|
| Printing, powdering, and curing |
|
| Color management and proofing |
|
| Quality control and dispatch |
|
| Troubleshooting and best practices |
|
| California-specific considerations |
|
| Best practices and continuous improvement |
|
Summary
The DTF Printing Workflow is an end-to-end process that California shops can adopt to streamline design to dispatch, emphasizing color accuracy, reliable equipment setup, and meticulous finishing for consistent, high-quality prints.
In a practical DTF printing workflow, stakeholders align on design preparation, color management, and precise transfer steps to minimize waste and misprints while delivering fast turnaround—critical in California’s dynamic apparel market.
By focusing on standardized procedures, proactive troubleshooting, and continuous improvement, businesses can improve consistency, customer satisfaction, and profitability while staying agile amid evolving demands and supplier landscapes.
California-specific considerations—climate, supply networks, compliance, and demand patterns—shape how you implement these steps in practice, ensuring the workflow remains efficient and scalable.